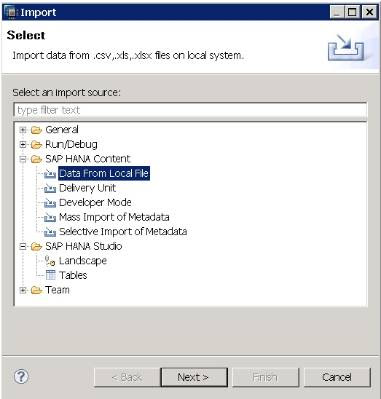
In this document, I would like to explain how the data can be uploaded into HANA DB through the “Data From Local File” option which is a new feature of HANA Studio Revision 28 (SPS04).
Pain in the past:
So far, uploading data into HANA from flat file is not a straight forward approach.
The user has to create some control (.ctl) files, have to place the flat file along with control file into server location, execute SQL scripts to import the data.
Or some users’ would have used SAP Information Composer to achieve this.
Instant Solution:
Now everything made so simple through “Data From Local File” import option. Through this option one can upload data from xls,xlsx and csv files.
How to:
Now will see how this can be done
1. Go to Quick Launch->Content Section->Import->SAP HANA Content->Data From Local File as shown below
2. Click Next
3. Select the target system where you want to import the data and click Next
4. Specify the required details in the following dialog,
Source File:
Browse for the source file (which you want to upload)
File Details:
Select the Field Delimeter (Comma or Semi Colon or Colon) and select from which Worksheet of your file, you want to import the data. If the file has single sheet then this option would be disabled
Import all data: With this option, either you can import all the data from flat file or you can mention the lines(For Eg : import the data from line number 5 to 50)
Header row exists: If the flat file has header row,just mention the header row number here. If there are no header row, simply uncheck this checkbox
Target Table:
New : If you want to create a new table in HANA DB with the data from flat file, then select this option. Specify the Schema name under which you want to create the table and the name of the table
Existing : If you want to append the flat file data into existing table, then go for this option
5. Click Next
Here the source and targets will be mapped by default. If the user wants to change, he can delete the join and remap with other columns also.
If the user wants to change the order (Up or Down) of the fields or if he wants to insert some new fields or delete the existing fields, these can be achieved by the top right corner icons
The user can set the Store Type to either Row Store or Column Store through the Drop down option. If the Store Type is set to Column Store then the Primary Key should have been set by user by selecting the respective Key Column checkbox.
The user can enter the description for each target field, if he wish to.
The Preview of the File Data will be shown in the lower portion of the screen
6. Click Next
This screen will show how the data will be stored in the target table in HANA. Just a Preview of the target table
7. Click Finish
8. Check the Job Log Entry
9. Now go to the Navigator Pane -> Catalog folder -> Schema you selected as target->Tables and look for the table you mentioned
10. Do the Data Preview of this table
This is the simplest and straightforward way to load the data from local flat file into SAP HANA.
I hope this feature would be much more helpful for the end users to instantly push the data from local system into HANA DB without much effort.
Source: scn.sap.com


No comments:
Post a Comment