For starters, the HANA client you install depends on which ArcGIS product you’re connecting to SAP HANA. In these screenshots, I’m running HANA Express. Since HANA Express is a multitenant system, instance 00 in this case, the port used in the ODBC Manager is 30013.
If you want to connect ArcGIS Desktop to HANA, you will need to install the 32 bit HANA Client ODBC driver. For ArcGIS Server and ArcGIS Pro, you will need to install the 64 bit HANA Client ODBC driver. You will need SAPCAR.exe to unpack downloaded .SAR file containing the HANA Client.
The three VMs in the landscape that I’m using to write my blogs have the following components installed:
After you login to the SAP Support website, you will see a page that looks like this:
If you want to connect ArcGIS Desktop to HANA, you will need to install the 32 bit HANA Client ODBC driver. For ArcGIS Server and ArcGIS Pro, you will need to install the 64 bit HANA Client ODBC driver. You will need SAPCAR.exe to unpack downloaded .SAR file containing the HANA Client.
The three VMs in the landscape that I’m using to write my blogs have the following components installed:
- ArcGIS Desktop 10.5. You should be running ArcGIS Desktop 10.3 or higher.
- ArcGIS Enterprise 10.5 (includes ArcGIS Server and ArcGIS Portal). You should be running ArcGIS 10.3 Server or higher
- SAP HANA Client 120 for Windows – 32 bit
- SAP HANA Client 120 for Windows – 64 bit
- ArcGIS Pro 1.4
- Insights for ArcGIS
- SAP HANA Express SPS 12
After you login to the SAP Support website, you will see a page that looks like this:
Next, click on Software Download and this page should appear:
Type “hana client” in the search box in the upper right, and this page should appear:
I chose to download 1.00 because I’m running HANA SPS 12. Click on SAP HANA CLIENT 1.00 and the following page will appear:
Because I want to connect ArcGIS Desktop to HANA Express, I selected “WINDOWS SERVER ON IA32 32BIT” in the pulldown in the middle of the page. To download the desired item, click on the file name as shown in the red oval above. Remember you’ll need the 64 bit Windows HANA Client for ArcGIS Pro. To access that, use the pulldown to select WINDOWS ON X64-64BIT
Once the item is downloaded, unpack the archive using SAPCAR.exe. You can download SAPCAR from the software download center as shown below.
The next step is to setup the ODBC driver. First, you must include the HANA client directory in the PATH environment variable in Windows. Assuming you have installed the HANA client on the C:\ drive, you would modify the path variable. The text in the red oval is the path to the 32 bit HANA client, the next entry is the path to the 64 bit HANA client.
If you don’t include the HANA client directory in the path, connecting to the source in a later step will fail. You should always attempt to connect to the data source to avoid problems in later steps. Remember that if you are connecting ArcGIS Pro to HANA, you will need to install the 64 bit HANA client and include that directory in the path as well.
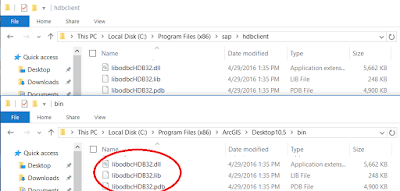
In previous releases of the HANA client, it was sometimes necessary to copy 3 files into the ArcGIS Desktop directory from the HANA client directory. However, modifying the PATH environment variable should be sufficient. Here is a screenshot for reference.
Next, start the 32 bit ODBC Manager. This dialog should appear after clicking on the System DSN tab. It is here where you will create the HANA ODBC connection.
To create a new connection, click on Add. In this case, I clicked on the Configure… button. Remember the Data Source Name because you’ll need it when creating a database connection in ArcCatalog. Enter the server and port information of the HANA instance you wish to connect to (see the link on ports I mentioned earlier).
In order for the ArcGIS platform to utilize the HANA spatial capabilities, you must create a Special property setting (SPATIALTYPES = 1) by clicking the Add button.
Now that you’ve entered the data source information and configured the special property, you should test the ODBC connection to make sure everything was entered properly.
If all is configured properly, click OK and you should see a Success dialog. Repeat these steps using the 64 bit ODBC Manager if you want to configure a 64 bit ODBC connection for ArcGIS Pro.
At this point, you’re ready to setup a database connection in ArcGIS Desktop using ArcCatalog. In this case, I started ArcMap, clicked on the Catalog tab on the right edge of the ArcMap window and double clicked on Add Database Connection. Enter the same data source name you used when creating the ODBC connection.
After you enter the authentication credentials, click OK. If you’ve entered everything correctly, a ‘+’ sign should appear next to the newly created entry. If it doesn’t, simply double click the new entry and you should see a list of tables and views available in the HANA instance you’ve connected to. For example:
For ArcGIS Pro, the process is similar except you add a new data source using the name of the 64 bit ODBC connection (that you configured using the 64 bit ODBC Manager). In this example, I used the same data source name for 64 and 32 bit ODBC connections. Here’s the ArcGIS Pro Database Connection dialog:


No comments:
Post a Comment