In the article SAP HANA Modeling Introduction we explained the basics of SAP HANA data modeling.
This article describes how to build a simple model using data stored on SAP HANA.
By the end of this, you will have created tables, attribute views, and analytical views in SAP HANA.
Prerequisite:
You have SAP HANA Studio installed on your machine.
You have added an SAP HANA system in HANA Studio
Create new tables in SAP HANA and fill them with data:
1. Open HANA Studio and expand the SAP HANA system.
2. Go to your schema. Right-click on your schema and select SQL editor.

Note: In this example schema name is "SAP_HANA_TUTORIAL". In case you want to create a new schema use below query.
create schema <schema_name>;
* Copy and paste the below script in SQL editor and execute.
--REPLACE <YOUR SCHEMA> WITH YOUR SCHEMA NAME
-- Create Product table
create column table "<YOUR SCHEMA>"."PRODUCT"(
"PRODUCT_ID" INTEGER null,
"PRODUCT_NAME" VARCHAR (100) null default ''
);
insert into "<YOUR SCHEMA>"."PRODUCT" values(1,'Shirts');
insert into "<YOUR SCHEMA>"."PRODUCT" values(2,'Jackets');
insert into "<YOUR SCHEMA>"."PRODUCT" values(3,'Trousers');
insert into "<YOUR SCHEMA>"."PRODUCT" values(4,'Coats');
insert into "<YOUR SCHEMA>"."PRODUCT" values(5,'Purse');
-- Create Region table
create column table "<YOUR SCHEMA>"."REGION"(
"REGION_ID" INTEGER null,
"REGION_NAME" VARCHAR (100) null default '',
"SUB_REGION_NAME" VARCHAR (100) null default ''
);
insert into "<YOUR SCHEMA>"."REGION" values(1,'Americas','North-America');
insert into "<YOUR SCHEMA>"."REGION" values(2,'Americas','South-America');
insert into "<YOUR SCHEMA>"."REGION" values(3,'Asia','India');
insert into "<YOUR SCHEMA>"."REGION" values(4,'Asia','Japan');
insert into "<YOUR SCHEMA>"."REGION" values(5,'Europe','Germany');
-- Create Sales table
create column table "<YOUR SCHEMA>"."SALES"(
"REGION_ID" INTEGER null,
"PRODUCT_ID" INTEGER null,
"SALES_AMOUNT" DOUBLE null);
insert into "<YOUR SCHEMA>"."SALES" values(1,1,100);
insert into "<YOUR SCHEMA>"."SALES" values(1,2,90);
insert into "<YOUR SCHEMA>"."SALES" values(1,5,85);
insert into "<YOUR SCHEMA>"."SALES" values(2,2,80);
insert into "<YOUR SCHEMA>"."SALES" values(2,1,75);
insert into "<YOUR SCHEMA>"."SALES" values(3,3,85);
insert into "<YOUR SCHEMA>"."SALES" values(4,4,75);
insert into "<YOUR SCHEMA>"."SALES" values(5,1,65);
insert into "<YOUR SCHEMA>"."SALES" values(5,2,65);
* After executing the scripts you should have 3 tables created. If there are no tables, try right-clicking on your schema and refreshing.

Note: To know all about create/update/delete tables in HANA, read the article Working with Tables in SAP HANA
Grant schema SELECT rights to _SYS_REPO user:
Open the SQL editor of your schema and execute the following command line:
GRANT SELECT ON SCHEMA <YOUR SCHEMA> TO _SYS_REPO WITH GRANT OPTION;
If you miss this step, an error will occur when you activate your views later.
Create an attribute view:
1. Open HANA Studio and make sure you are in Modeler perspective

2. Create a new package under the content folder.
Right-click on the content folder and choose "New" -> "Package." Fill the fields "Name" and "Description" and click "OK."
If you dont see the new package after this, try right-clicking on the content folder and refreshing.
3. Right click on the package and choose "New Attribute View." Enter a name and a description and click "Finish

4. The attribute view will be opened in the HANA studio editor. Select "+" sign on "Data Foundation"

5. Search for table "REGION" and select it.

6. Now add the columns from the REGION table to output. Simply right click on the column and select "Add to Output". Add all 3 columns REGION_ID, REGION_NAME, SUB_REGION_NAME to the output.
Once it is done, you will see the selected column in right side pane.

7. Now select "Semantics". All 3 columns appears under Column pane as attributes.

8. Now you need to define attributes and key attributes. Every attribute view must have at least one key attribute.
9. Click on the "Type" to select key attribute for REGION_ID.

10. Click on the "Save and Activate" button on top right corner to activate the view.

11. In the "Job log" Pane you will see an activation completed message.

12. Attribute view is created and activated.
To see the output of this view click on the "Data Preview" button on top right corner.

Then select "Raw Data" tab.

Congratulation!! You have successfully created your first modeling view.
Next step is to create an analytic view.
Create an Analytic View:
1. Right click on the package and choose "New Analytic View." Enter a name and a description and click "Finish"

2. Click on "+" sign of "Data Foundation" and add table SALES.

3. Right Click on the columns of table SALES and add REGION_ID and SALES_AMOUNT to output.

4. Click on "+" sign of "Logical Join" and add attribute view "AT_Region" which was created earlier.

5. Click on the REGION_ID from "Data Foundation" and connect it to the REGION_ID of attribute view AT_Region. In the properties pane select join type as left outer join and cardinality as n..1

6. Select "Sementics". In the right side change the column type of SALES_AMOUNT as measure.

7. Activate the analytic view similar to attribute view.
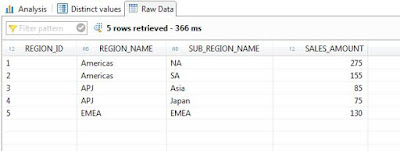
Right-click on your analytic view and choose "Data Preview." After that, you can browse through the tabs named raw data, distinct values, and analysis.


Congratulation!! You have successfully created your first Analytic View.
No comments:
Post a Comment